

Last verified September 2026
Daniel Pryce, Features Reporter.
There is a particular kind of dressing-table sigh that happens when you go looking for one bottle and find six near-identical ones instead: a good red, an almost-good red, and four that have gone thick and gluey because the cap wasn’t twisted shut properly. You start typing the same question into your phone every few months: why does this chip by Wednesday when the last one lasted a fortnight? The honest answer has very little to do with the price on the shelf at Boots or Superdrug and a great deal to do with things most of us never learn to look for: brush shape, pigment density, and what actually happens to varnish once it meets a nail bed with natural oils on it. None of this requires a chemistry degree. It requires knowing where to look, and in what order, before the bottle goes in the basket. This guide walks through what a trained eye checks first, and how to run the same checks yourself in the chemist aisle or at your own dressing table, so the next bottle earns its place rather than joining the drawer of near-misses.
- The brush matters as much as the formula: a wide, flat brush lays colour in fewer strokes and leaves fewer visible ridges than a thin, rounded one.
- Chipping usually starts at the free edge of the nail, not the top surface: it is a preparation and base-coat problem far more often than a top-coat one.
- ‘Free-from’ labels describe what has been left out, not how long the manicure will last: judge wear by formula viscosity and application method, not by the ingredient list alone.
Reading The Brush Before The Bottle
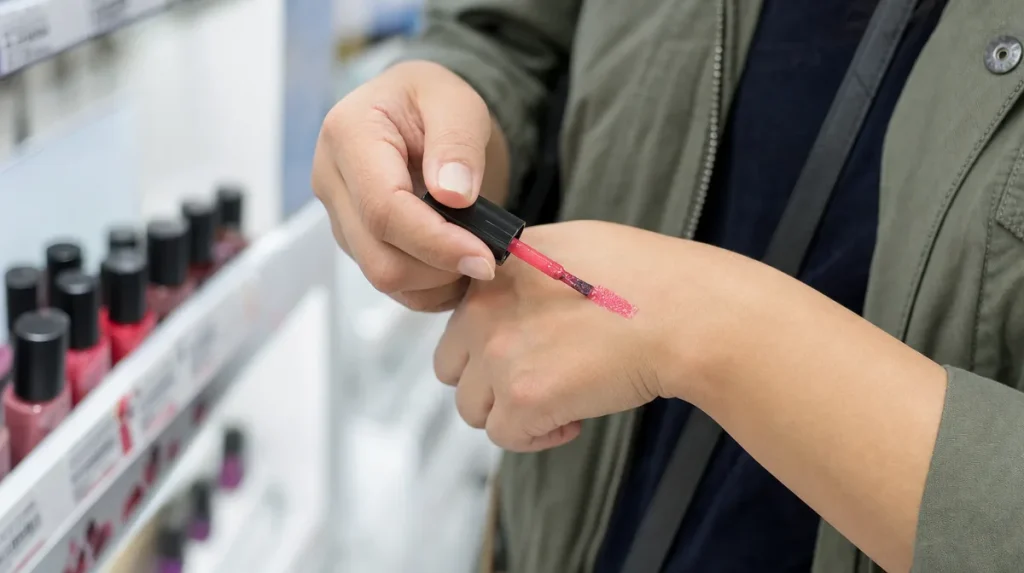
Turn the cap and look at the brush before you look at the colour. A wide, flat brush with densely packed bristles picks up more polish in one dip and spreads it in two or three strokes. A thin, rounded brush, the sort found on a lot of cheaper ranges, needs four or five strokes to cover the same nail, and every extra stroke drags at polish that has already started to set, leaving faint ridges.
Think of it the way a decorator thinks about a paintbrush: a wide brush covers a wall evenly, a narrow one leaves visible lines unless you go over them repeatedly, and going over wet paint repeatedly is exactly what causes streaking.
A quick self-test works in the shop, cap off, no purchase needed: sweep the brush once across the back of your hand. If the bristles splay unevenly or leave gaps, the same will happen on a nail. If they hold their shape and release colour smoothly, that is a good sign regardless of the price point.
The mistake most people make is choosing colour first and brush second, then blaming the formula for a patchy result that was actually an applicator problem. A brush cannot fix a poor formula, but a poor brush can ruin a good one.
Pigment Versus Filler: What Actually Makes Colour Opaque
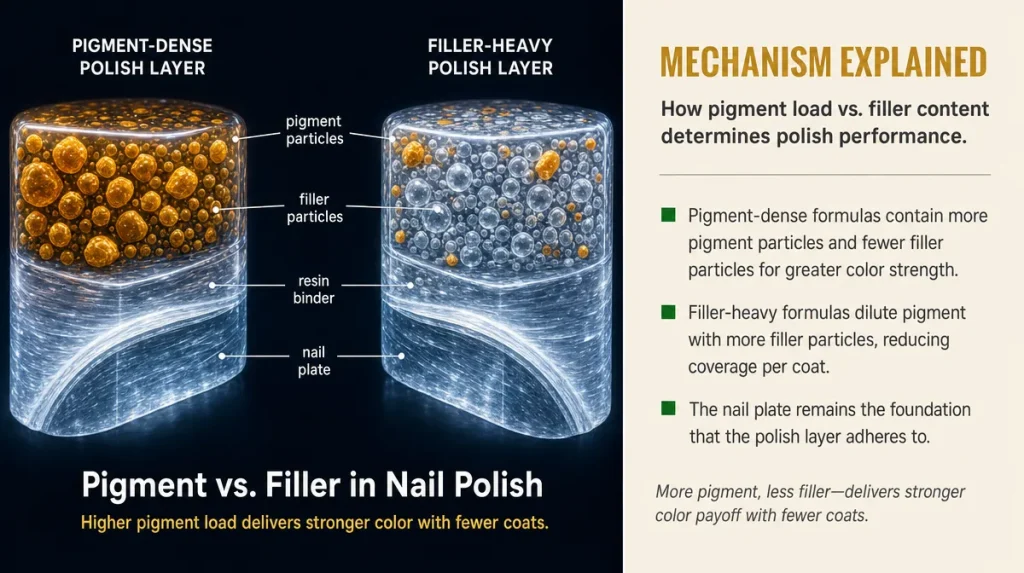
Two bottles can look identical on the shelf and behave completely differently on the nail, because what sits inside them is not the same ratio of pigment to filler. Pigment is what gives colour its opacity; fillers, usually mica or resin, bulk the formula out and keep costs down.
A useful comparison is watercolour paint against poster paint. Watercolour is heavily diluted and needs several layers to look solid. Poster paint is pigment-dense and covers in one pass. Nail polish works the same way: a well-pigmented formula reaches full opacity in two coats, while a filler-heavy one needs three or four, and each extra coat adds drying time and risk of smudging.
A 2023 study in the Journal of Cosmetic Science examining pigment dispersion in nail lacquers found that formulas with higher pigment-to-resin ratios reached visual opacity in significantly fewer coats than filler-heavy equivalents, and held colour density longer under abrasion testing.
The practical test is simple: paint one coat and look at it under a window, not a shop’s overhead lighting. If you can still see the nail through the colour after one coat, the formula is filler-heavy, not necessarily bad, but it will need building up, and building up thickens the final layer, which is often where chipping starts.
Why A Manicure Chips On Day Three, Not Day Ten
Chipping almost never starts in the middle of the nail. It starts at the free edge, the tip where the nail curves over your fingertip, because that edge takes the most contact through the day: keys, taps, zips.
The mechanism is straightforward. Polish adheres to the nail surface through a very thin chemical bond, and that bond is weakest where there is natural oil left behind from the cuticle or where the nail wasn’t fully dry before painting. It is much like sticking tape to a dusty shelf: the tape holds in the clean patches and lifts at the edges where dust sat.
A base coat exists specifically to solve this. It is formulated to grip the nail keratin more effectively than coloured polish can on its own, giving the colour something reliable to bond to rather than bonding directly to a surface that still has traces of hand cream or cuticle oil on it.
The common mistake is skipping the base coat to save two minutes, or applying colour straight after using a rich hand cream. Both leave a barrier between polish and nail. Capping the free edge, sweeping the brush over the very tip of the nail with each coat, also matters more than most people realise: it seals the edge that takes the most daily wear and is usually the first place chipping is visible.
The Free-from Labels, Decoded
Bottles marked 3-free, 5-free or 10-free have become a shorthand for quality, but the number only tells you which chemicals have been excluded, commonly toluene, formaldehyde, dibutyl phthalate, and more recently camphor and xylene. It says nothing about pigment load, brush quality, or how long the polish will wear.
Which? has published general consumer guidance on cosmetic ingredient labelling for years, and its broader advice on reading claims applies here: a label describing an absence is not the same as a label describing performance. The British Beauty Council’s policy work on ingredient transparency makes a similar point, that clearer labelling helps shoppers avoid certain chemicals but was never designed to signal durability.
This matters because free-from formulas sometimes use different resin systems to compensate for the removed ingredients, and those resin systems can behave differently in terms of flexibility and chip resistance. Neither better nor worse universally, just different, which is why two 5-free polishes from different ranges can wear completely differently.
The sensible approach is to treat free-from labelling as a separate decision from a durability decision. If avoiding certain chemicals matters to you, choose on that basis, then judge wear and pigment separately using the brush and coat tests above rather than assuming the label covers both.
Why The Colour In The Bottle Isn’t The Colour On Your Nail
Bottle glass distorts colour, shop lighting distorts it further, and your own skin undertone changes how a shade reads once it’s on. A red that looks orange-leaning under fluorescent strip lighting can look properly blue-red in daylight, and vice versa.
Marie Claire UK’s beauty desk has long advised checking colour swatches near a window rather than under artificial light, general guidance that holds up under simple physics: fluorescent and LED shop lighting both skew colour temperature, while daylight is closer to a neutral baseline.
A nail-specific complication is that colour also depends on the number of coats. Sheer, jelly-style formulas shift shade as they build, a pale pink can turn noticeably deeper by the third coat because you are now seeing pigment stacked on pigment rather than pigment plus visible nail underneath.
The practical fix is to test on your own nail, not the back of your hand, since nail keratin and skin have different base tones and reflect colour differently. Paint one nail, wait for it to dry fully, then look at it in daylight before committing the other nine. It takes an extra ten minutes and avoids the far more common outcome: a manicure that looked right in the shop and wrong by the time you’re home.
The Application Order That Actually Extends Wear
Most chipping complaints trace back to sequence, not product. The order that holds up best, base coat, two thin colour coats, top coat, applied with drying time between each layer, sounds basic, and it is basic, but it is skipped constantly under time pressure.
Thin coats matter more than most people expect. A thick single coat looks fully opaque immediately but takes far longer to cure through to the base, and polish that hasn’t cured through is soft and prone to denting for the first hour, sometimes longer. Two thin coats, each properly dried, cure faster overall and produce a harder, more chip-resistant surface than one thick one.
Cuticle oil is often applied at the wrong moment. Used before polishing, it leaves a residue that stops base coat adhering properly, the sticky-tape-on-dust problem again. Used after the manicure has fully dried, typically the following morning, it does the job it’s meant for: keeping the surrounding skin supple without interfering with the bond underneath.
A top coat reapplied every two or three days, rather than left to do all the work from day one, extends wear noticeably by refreshing the seal over the free edge before it starts to lift. It is a small habit, and it is the single easiest way to add days to a manicure without changing the polish itself.
Knowing When A Bottle Has Gone Off
Polish thickens with age because the solvent that keeps it liquid evaporates slowly every time the cap is off, even briefly. A bottle used twice a month for a year will noticeably thicken; a bottle used weekly may last barely six months before it starts to drag.
A thickened polish behaves differently from a fresh one even with the same brush technique: it drags rather than glides, dries with visible brush marks, and often needs an extra coat to look even, which then takes longer to cure, which then chips sooner. The formula hasn’t failed as such, it has simply lost the solvent balance it needs to level itself out.
Rolling a bottle gently between your palms before use redistributes pigment that has settled without introducing air bubbles, which shaking does. Air bubbles trapped in polish show up as tiny craters once it dries, a common and avoidable flaw.
A simple self-test: if the brush pulls threads of polish rather than releasing it smoothly, or if the polish pools rather than levelling within a few seconds, the bottle has thickened past its useful life. A few drops of proper nail polish thinner, sold specifically for this and different from nail polish remover, can extend a bottle briefly, but a bottle that needs thinning every use is close to its end regardless of how much is left in it.
Reading ‘Up To Ten Days’ Claims Honestly
Durability claims printed on packaging come from controlled testing, usually measuring chip resistance on a set number of test subjects under standardised conditions rather than everyday life. Good Housekeeping Institute’s Tried and Tested approach to household product testing, applied broadly across categories, involves repeated, standardised use rather than a single trial, and that distinction matters for nail polish specifically.
Everyday hands do things a lab panel rarely replicates in the same volume: repeated hot water exposure from washing up, contact with hand sanitiser, typing, gardening. Any one of these accelerates wear on the free edge long before ten days is up.
The honest way to read a durability claim is as an upper limit reached under favourable conditions, not a guarantee. A polish that claims up to ten days might genuinely deliver that on a quiet week with gloves worn for washing up, and closer to four or five days with an average week’s wear and tear.
Stylist and Cosmopolitan UK’s beauty awards, and the general shorthand of an editor-tested pick, tend to reflect real-world wear reported by testers over normal weeks rather than laboratory maximums, which is often a more useful reference point than the number printed on the box. Treat the packaging figure as a best case, and judge your own results against your own hands rather than the claim.
Key Takeaways
- The brush shape affects coverage and streaking as much as the formula does; test it on the back of your hand before buying.
- Pigment density, not price, determines how many coats a colour needs to look solid.
- Chipping starts at the free edge because of oil residue or missed base coat, far more often than a weak top coat.
- Free-from labels describe excluded ingredients, not durability; judge wear separately.
- Check colour in daylight on your own nail, not the shop’s lighting or the back of your hand.
- Thin coats with drying time between them cure harder and chip less than one thick coat.
- Polish thickens as solvent evaporates; roll rather than shake, and retire a bottle that drags or pools.
- Printed durability claims are best-case figures from controlled testing, not everyday guarantees.
A Two-minute Checklist Before You Buy
- Sweep the brush across the back of your hand: does it splay or hold its shape
- Check the colour swatch near a window, not under shop lighting
- Note whether the formula looks sheer or opaque in one light layer
- Confirm you have, or will buy, a proper base coat to go with it
- If durability is printed on the box, read it as an upper limit, not a promise
This article is general information and does not replace advice from a qualified professional.
Individual results may vary.